
Osteotomies of the proximal femur are performed to realign the hip joint or the femur for proper function. It involves dividing the bone, correcting the deformity, and stabilizing the bone fragments in the new position to promote quick healing. Femoral osteotomy is considered a major operation that takes 1-2 hours under adequate anesthesia, involves moderate amount of blood loss, hospitalization for 2-3 days, and limited weight bearing with a walker or crutches for 6 weeks. Infection and delayed healing can occur needing more surgery. The plate and screws used to fix the bones in growing children are usually removed after adequate healing the bones.
Rotational Osteotomy
Femoral rotational deformity can be from head tilt, neck shaft version, or torsion in the shaft. Head tilt as in a SCFE is ideally corrected with a sub capital osteotomy, neck version with inter trochanteric rotational osteotomy plus greater trochanter (GT) transfer to realign the abductor insertion, and shaft torsion with a shaft osteotomy. Rotation osteotomy distal to the GT performed without GT optimization may not always influence the hip and may just change the foot progression angle.
A rotational osteotomy of the femur can be done at any level, but the more distal osteotomy has less effect on the hip. I aim to do it just below the lesser trochanter when using a blade plate and more distal when using a nail. Healing has not been an issue with minimal stripping, low heat producing osteotomy, good contact of the fragments, and stable fixation. Different than a traumatic ST fracture which requires a lot of energy, strips soft tissues, and difficult to reduce and fix well.
The osteotomy is performed with open incision for plate fixation and is percutaneous for intramedullary nail fixation. Reaming after performing the osteotomy theoretically decreases embolism and pushes bone graft into the osteotomy site. Avoids the need for additional venting of the canal. The amount of rotational correction can be estimated clinically by inserting half pins away from the nail path in the proximal and distal femur before completing the osteotomy and dialing in the correction based on the pin position afterwards. The proximal pin is placed medially just proximal to the lesser trochanter from straight anterior to posterior and the distal pin is placed into the lateral femoral condyle in the mid lateral plane. The two pins are at 90 degree angle to each other. The final correction is confirmed by examining the hip rotation after fixation of both fragments with screws.
The sequence was pin placement, proximal canal entry, percutaneous osteotomy, reaming over a guidewire, nail just across the osteotomy, rotate and compress the osteotomy, seat and lock the nail.
Valgus Osteotomy
Valgus osteotomy of the hip is better done below the lesser trochanter with lateral translation of the distal fragment and varus above the lesser trochanter with medial translation.
Femoral Neck Nonunion & Valgus Osteotomy
The ideal treatment should restore neck length, healing and normal hip function. A biologic bone block plus fixation in the nonunion site will be the best if available.
Options to heal the nonunion:
- Direct bone grafting – not commonly done or required. Donor site morbidity, extra dissection, time, cost.
- Fibular strut grafting – commonly done. Restores neck bone mass and length. Donor site morbidity, extra work, needs spacing with hardware and additional valgus osteotomy.
- Valgus osteotomy – flattens the fx line, increases compression, stimulates healing. Most commonly done. Decrease abductor lever arm and pelvic width, increase hip stresses, FIR, leg length, abductor resting length.
Normal hip function requires:
- Neck angle and offset – to decrease impingement
- Neck length / lateral offset – abductor lever arm, pelvis width, ischial impingement, joint forces
- Greater trochanter height – abductor resting length, joint stresses, GT impingement
Scenario 1 – If closed reduction with traction restores acceptable NSA, version, and neck length, stabilize the head on the neck, fix with sliding device, add valgus osteotomy. (Fibula is an option)
Scenario 2 – Open reduce the fracture if needed with or without bone grafting. Fix plus valgus osteotomy.
Scenario 3 – Neck resorbed. Accept coxa breva, increase neck length with bone graft. Sliding implant if bone graft is structurally sound. If not, bridging fixation across the nonunion and valgus osteotomy.
Do as much valgus as necessary to compress the nonunion site. Valgus at any level:
- Rotates the fovea up
- Increases risk of lateral subluxation
- Lengthens the limb
- Decreases abductor lever arm
- Increases abductor resting length
- Increases joint reaction forces
- Medializes the femoral shaft
- Narrows the pelvis
Valgus medial to the intertrochanteric line minimizes GT height changes and medialization of the femoral shaft, but increases instability from the capsulotomy.
- Opening wedge lengthens the neck, but slows healing
- Closing wedge shortens the neck and increases instability
- Least effect on leg length, GT height, and medialization of femur
- No need for a plate
Valgus through the Greater Trochanter — only closing wedge possible. Good cancellous surfaces bleeding into the osteotomy site. Can put good bone into the nonunion site without capsulotomy. Fixation not strong enough to avoid external support. Plate fixation is not helpful; cable around GT & LT can avoid bracing.
Valgus just above LT — opening wedge tensions iliopsoas and restricts lateral translation. Less translation required to restore mechanical axis. Easier to translate with closing wedge which puts less tension on iliopsoas. Plate fixation indicated.
Valgus below LT — needs maximum translation to restore axes. Less bone contact. Medial prominence of the lesser trochanter can impinge against the ischium. Needs strong fixation.
Solutions for side effects:
- Foveal impingement or lateral instability can be corrected by PAO or second stage varus osteotomy
- Neck length can be increased with true or relative neck lengthening
- Medialization of the femur can be corrected with lateral translation of the shaft
- Abductor lever arm can be increased with varus or lateral transfer of GT
- Abductor resting length can be shortened with proximal transfer of GT
- LT impingement can be relieved with LT excision
- Leg can be shortened by removing some medial cortex
Principles & Technique
Femoral neck nonunion fixation is done either with an implant that allows sliding and dynamic compression of the nonunion site or bridging implant to maintain neck length. Dynamic compression is achieved by placing the implant along the neck axis. Bridging screws need not be along the neck axis but they need to have good fixation into the head.
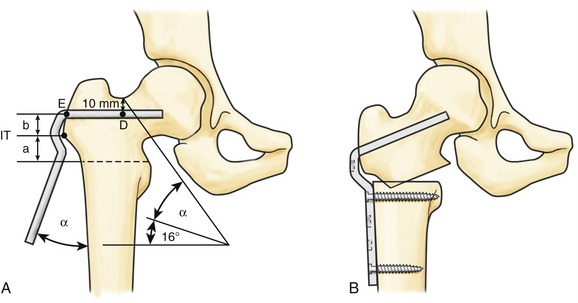
Subtrochanteric valgus osteotomy requires strong fixation in the proximal fragment and distal fragment with good compression between the two fragments. Strong fixation into a short proximal fragment is best achieved with a fixed angle device. The angle of the plate is less important in isolated subtrochanteric osteotomy fixation. Even a 90 degree blade plate can be used to get 145 NSA by inserting the blade in 55 degrees of varus into the proximal fragment. Even an IM rod can be used by reaming the proximal canal to align with the distal canal after correction.
The ideal implant to fix the head well along the neck axis and get a 145 neck shaft angle is a 145 degree blade plate or DHS. The ideal bridging fixation is a 145 degree locking plate. Any other angle will compromise the alignment or fixation.
Blade plate chisel needs to be inserted correctly in two planes and is harder to revise or adjust due to the bigger tract it makes. Locking plates are easier with adjustment of the sagittal plane with the second screw. A single angle plate will get lateral translation automatically, while the top bend needs to be left proud over the GT to get the same translation with a double angled plate. Lateral translation can be increased by leaving either plate proud at the GT. Appropriate translation aligns the femoral shaft with the piriformis fossa and limb mechanical axis to pass through the center of the knee.
For those who like to simplify peritrochanteric osteotomies — no lines to draw, angles to measure, or wedges to take. Plan as much as needed to do a good job:
- Varus above GT, valgus below GT
- Varus translate medially, valgus laterally, flexion anteriorly, extension posteriorly till the shaft lines up with the piriformis fossa
- Select a fixed angle implant with the angle closest to the target neck shaft angle
- The only brainy part is to decide where the blade or locking screws go into the proximal fragment. Put them in a way that when the plate is reduced to the shaft after the osteotomy, you get your NSA and flexion/extension. For example, if you want 145 NSA, put the blade in the center of the neck if a 145 plate is available. If you have a 120 plate, put it in 25 degrees of varus to get 145. If you need flexion, rotate the chisel to the degree required. With locking plates with two locking screws, insert the anterior locking screw more proximally to get the flexion.
- Valgus plate can be fixed fully to the proximal fragment before performing the osteotomy; varus after completing the osteotomy and displacing the bone fragments.
- Consider cabling Gluteus medius tendon to the plate for big valgus corrections to protect the GT and prevent the plate from cutting out.
- Mark the rotation before osteotomy or decide on optimal rotation based on hip motion after provisional fixation of the plate to the shaft.
- Fix the plate to proximal fragment adjusting the depth of insertion to the desired translation. Reduce plate to shaft, verify correction, adjust translation and rotation. Compress the osteotomy by manual loading, dynamic screw compression, or lagging the bone to plate from distal to proximal. Compression allows healing even with less surface contact.
A few practical issues to watch out for:
- Availability of full hardware — hip plates from Synthes are expensive; there are equivalent implants from local manufacturers
- Calculation of NSA and estimation of desired correction can be tricky with long-standing pathologies and confounding torsional malalignment
- Soft tissue factors — scarring from previous surgeries and infectious etiology
My goal for hip reconstruction is to put the best cartilage to bear weight, stable joint, impingement-free motion, and good abductor function. ATD, leg length, and cosmesis are dealt with separately if needed without compromising the primary goal.
Varus Deformity Correction
- Head varus like a SCFE — neck osteotomy is ideal; distal osteotomy with proper translation is acceptable
- Short neck and high GT — GT transfer or RNL to also increase FIR
- Varus at the neck shaft — valgus peritrochanteric osteotomy
Varus Producing Femoral Osteotomy
Varus at any level:
- Rotates the head medially
- Contains the head better and decreases lateral subluxation
- Shortens the limb
- Widens the pelvis
- Increases abductor lever arm, but shortens abductor resting length
- Short limb and Trendelenburg gait
- Increases lateral shear stress on the head
- Increases foveal impingement with medial acetabular dysplasia / high fossa
Varus medial to the intertrochanteric line minimizes GT height change and is the correct level for caput valgum correction, but more complicated to perform and heal.
- Opening wedge lengthens the neck, but slows healing
- Closing wedge shortens neck and increases instability
- Less effect on leg length, GT height, and lateralization of femur
- No need for a plate
Varus just above LT — opening wedge minimizes shortening. Less translation required. Decreases FIR and increases the risk of intra- and extra-articular impingement. GT becomes very prominent laterally, especially if RNL is also done. Plate fixation is necessary and the double bend needed for translation adds to lateral prominence.
Varus below LT — needs maximum translation to restore axes. Less bone contact. Medial capsule and iliopsoas resist varus correction. Needs strong fixation; the distal end of the proximal fragment and the plate become very prominent unless the plate is sunk deeper by removing the lateral cortex. Increases impingement.
Solutions for side effects:
- GT height and FIR can be corrected with RNL
- Neck length can be decreased with neck shortening
- Lateralization of the femur can be corrected with medial translation of the plate and shaft
Principles & Technique (Varus)
Intertrochanteric varus osteotomy requires strong fixation in the proximal and distal fragments with good compression between them. Strong fixation into a short proximal fragment is best achieved with a fixed angle device. Even an IM rod can be used by reaming the proximal canal to align with the distal canal after correction.
A double angle plate will get medial translation automatically. Appropriate translation aligns the femoral shaft with the piriformis fossa and the limb mechanical axis to pass through the center of the knee. Varus osteotomy has to be completed and fragments displaced before seating the plate in the proximal fragment.
Step-by-step approach:
- Varus above GT, valgus below GT
- Translate medially for varus, laterally for valgus, anteriorly for flexion, posteriorly for extension until the shaft lines up with the piriformis fossa
- Select a fixed angle implant with the angle closest to the target neck shaft angle
- Decide where the blade or locking screws go into the proximal fragment so that when the plate is fixed and reduced to the shaft, you achieve your NSA and flexion/extension. For example, for 120 NSA with a 120 plate, put the chisel in the center of the neck. With a 110 plate, put it in 10 degrees of valgus to get 120. With locking plates, insert the anterior locking screw more proximally for flexion.
- Varus plate can be fixed to the proximal fragment only after performing the osteotomy. Ensure the chisel is loose for easy withdrawal after the osteotomy.
- Mark rotation before osteotomy or decide based on hip motion after provisional fixation.
- Fix the plate to the proximal fragment adjusting depth of insertion for desired translation. Removing the lateral cortex allows deeper seating of the plate.
- Reduce plate to shaft, verify correction, adjust translation and rotation. Compress the osteotomy by manual loading, dynamic screw compression, or lagging bone to plate from distal to proximal.
A few practical issues to watch out for:
- Availability of full hardware — hip plates from Synthes are expensive; there are equivalent implants from local manufacturers
- Calculation of NSA and estimation of desired correction can be tricky with long-standing pathologies and confounding torsional malalignment
- Soft tissue factors — scarring from previous surgeries and infectious etiology
My goal for hip reconstruction is to put the best cartilage to bear weight, stable joint, impingement-free motion, and good abductor function. ATD, leg length, and cosmesis are dealt with separately if needed without compromising the primary goal.
Varus or valgus osteotomies can be done with any implant if the correction is obtained first and the implant is fixed to both fragments to hold that correction.